LaneNet-Lane-Detection
Use tensorflow to implement a Deep Neural Network for real time lane detection mainly based on the IEEE IV conference paper “Towards End-to-End Lane Detection: an Instance Segmentation Approach”.You can refer to their paper for details https://arxiv.org/abs/1802.05591. This model consists of a encoder-decoder stage, binary semantic segmentation stage and instance semantic segmentation using discriminative loss function for real time lane detection task.
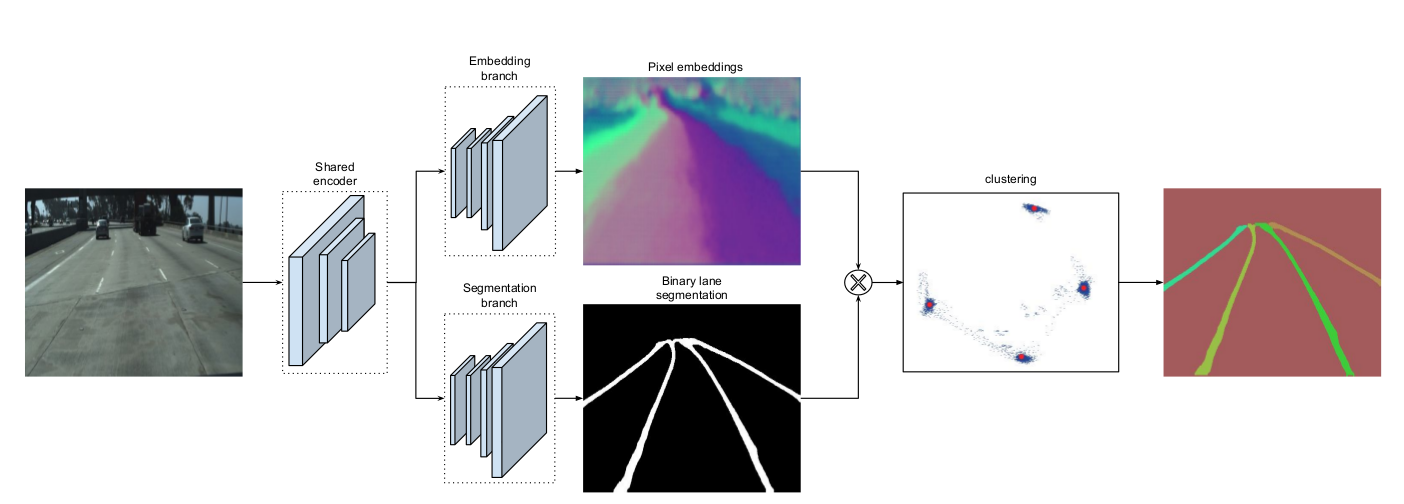
The main network architecture is as follows:
Network Architecture
Installation
This software has only been tested on ubuntu 16.04(x64), python3.5, cuda-9.0, cudnn-7.0 with a GTX-1070 GPU. To install this software you need tensorflow 1.12.0 and other version of tensorflow has not been tested but I think it will be able to work properly in tensorflow above version 1.12. Other required package you may install them by
pip3 install -r requirements.txt
Test model
In this repo I uploaded a model trained on tusimple lane dataset Tusimple_Lane_Detection. The deep neural network inference part can achieve around a 50fps which is similar to the description in the paper. But the input pipeline I implemented now need to be improved to achieve a real time lane detection system.
The trained lanenet model weights files are stored in lanenet_pretrained_model. You can download the model and put them in folder weights/tusimple_lanenet/
You may also download the pretrained model via BaiduNetDisk here and
extract code is 86sd.
You can test a single image on the trained model as follows
python tools/test_lanenet.py --weights_path /PATH/TO/YOUR/CKPT_FILE_PATH
--image_path ./data/tusimple_test_image/0.jpg
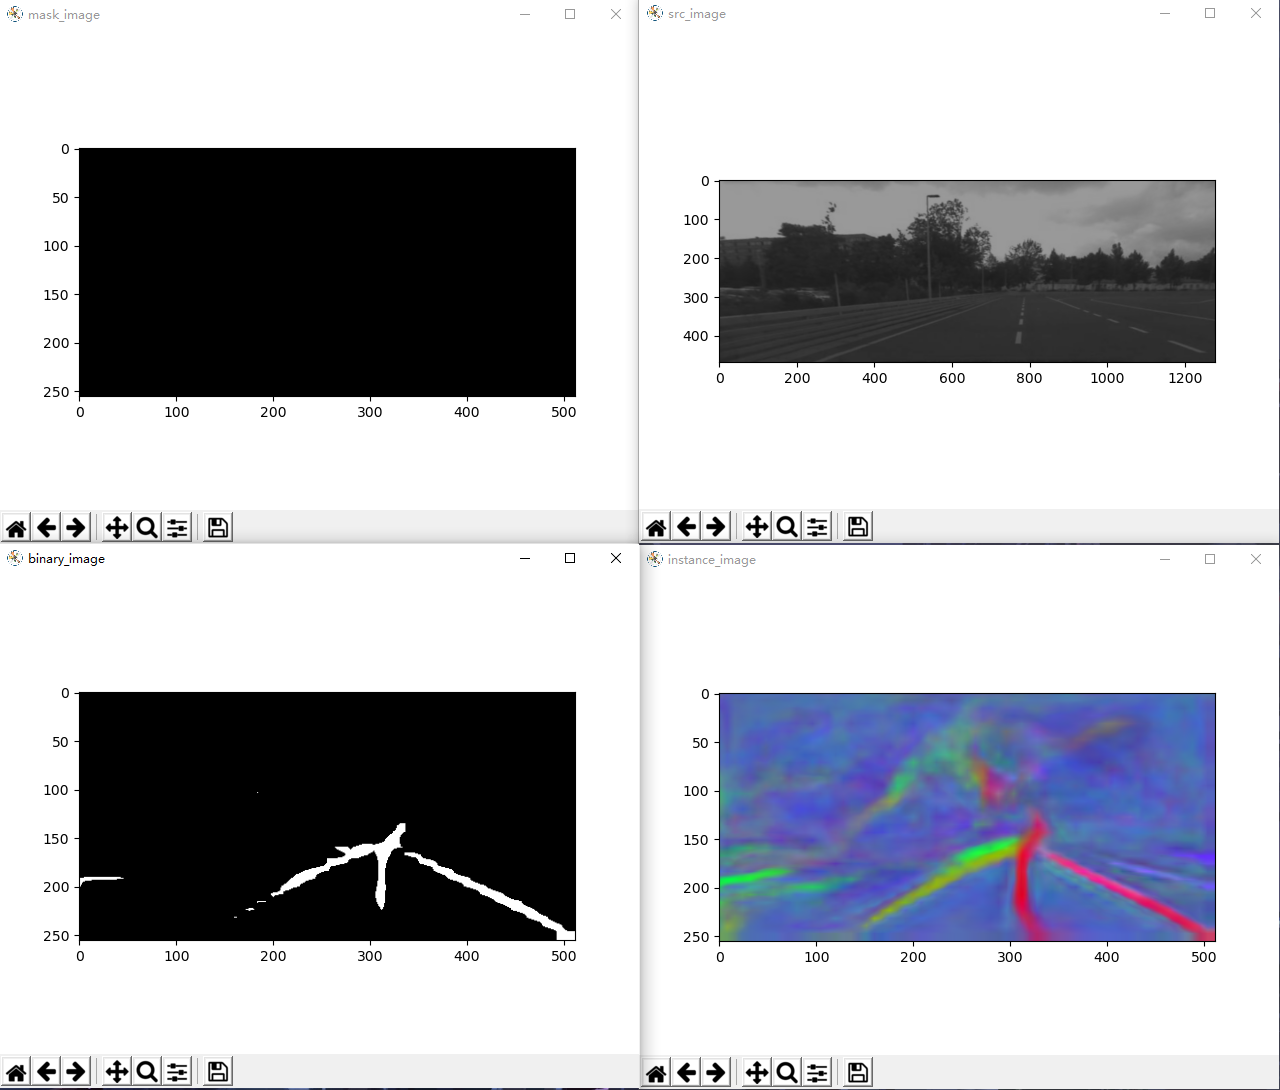
The results are as follows:
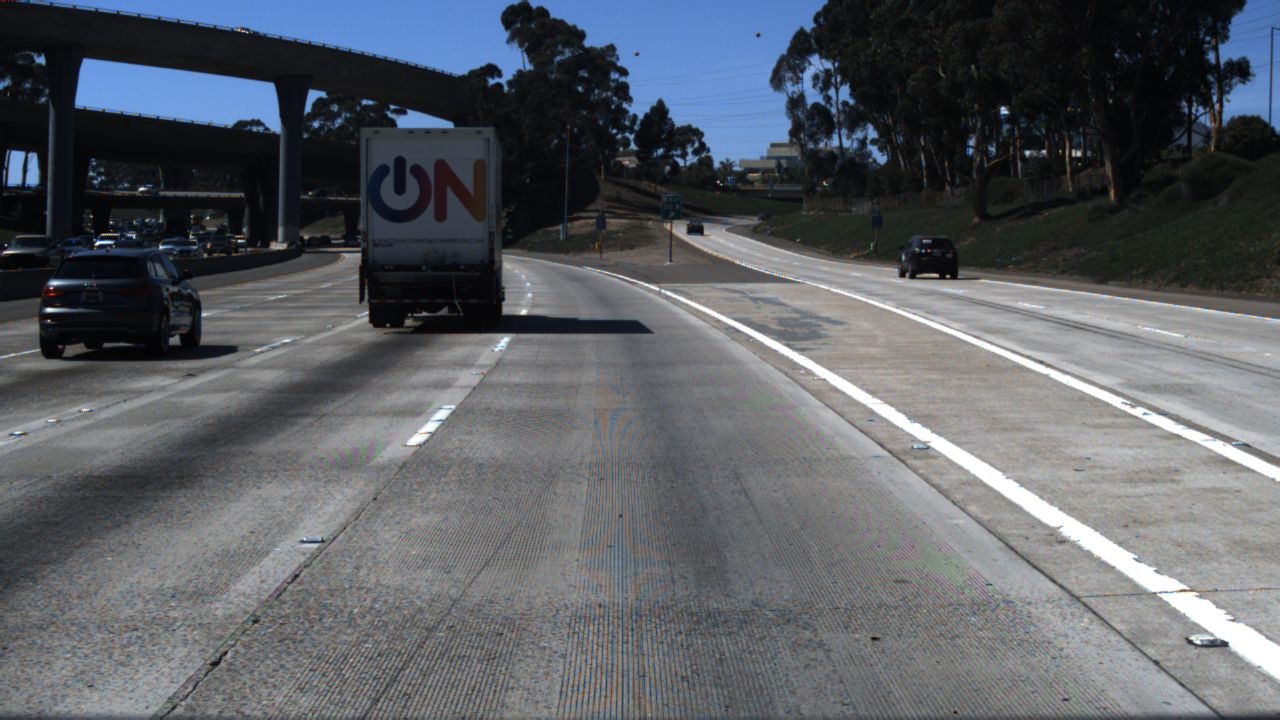
Test Input Image
Test Lane Mask Image

Test Lane Binary Segmentation Image

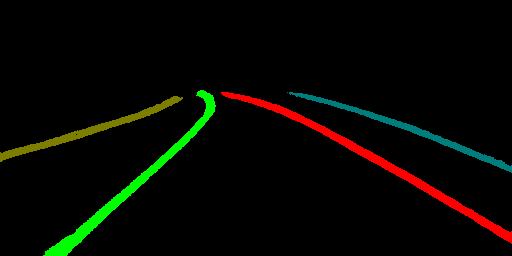
Test Lane Instance Segmentation Image
If you want to evaluate the model on the whole tusimple test dataset you may call
python tools/evaluate_lanenet_on_tusimple.py
--image_dir ROOT_DIR/TUSIMPLE_DATASET/test_set/clips
--weights_path /PATH/TO/YOUR/CKPT_FILE_PATH
--save_dir ROOT_DIR/TUSIMPLE_DATASET/test_set/test_output
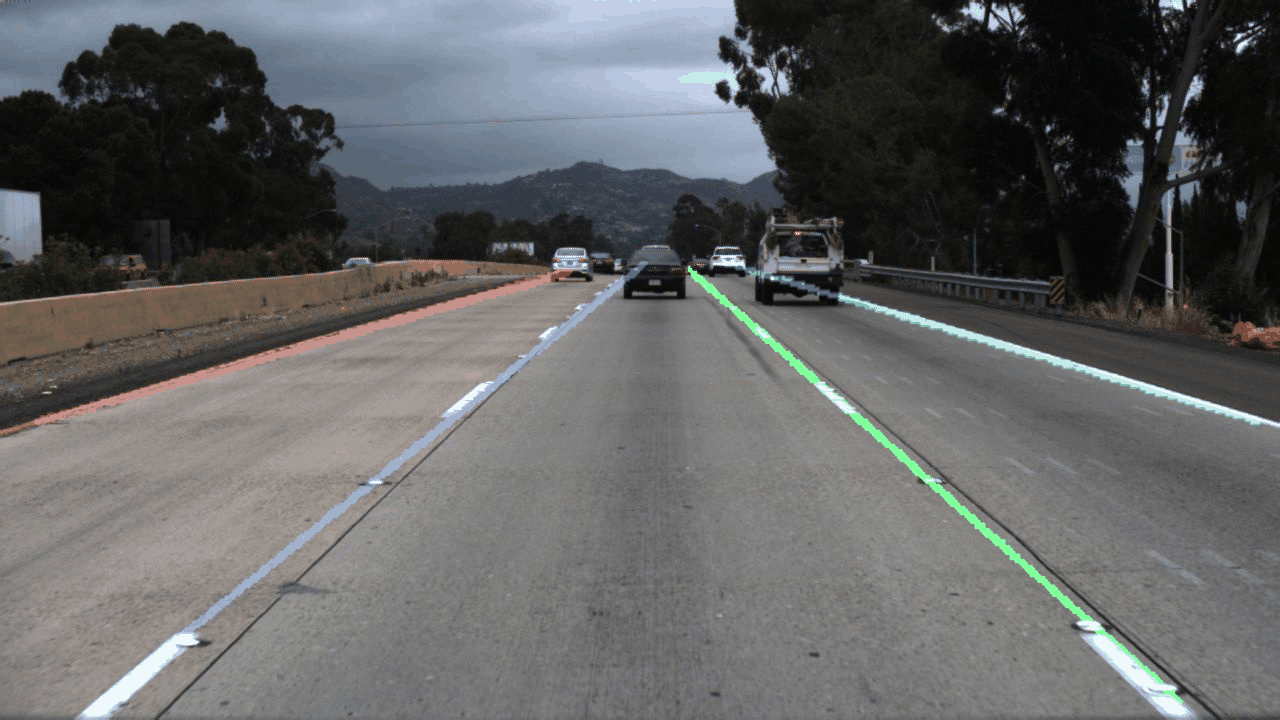
If you set the save_dir argument the result will be saved in that folder or the result will not be saved but be displayed during the inference process holding on 3 seconds per image. I test the model on the whole tusimple lane detection dataset and make it a video. You may catch a glimpse of it bellow.
Tusimple test dataset gif
Train your own model
Data Preparation
Firstly you need to organize your training data refer to the data/training_data_example folder structure. And you need to generate a train.txt and a val.txt to record the data used for training the model.
The training samples consist of three components, a binary segmentation label file, a instance segmentation label file and the original image. The binary segmentation uses 255 to represent the lane field and 0 for the rest. The instance use different pixel value to represent different lane field and 0 for the rest.
All your training image will be scaled into the same scale according to the config file.
Use the script here to generate the tensorflow records file
python tools/make_tusimple_tfrecords.py
Train model
In my experiment the training epochs are 80010, batch size is 4, initialized learning rate is 0.001 and use polynomial decay with power 0.9. About training parameters you can check the global_configuration/config.py for details. You can switch –net argument to change the base encoder stage. If you choose –net vgg then the vgg16 will be used as the base encoder stage and a pretrained parameters will be loaded. And you can modified the training script to load your own pretrained parameters or you can implement your own base encoder stage. You may call the following script to train your own model
python tools/train_lanenet_tusimple.py
You may monitor the training process using tensorboard tools
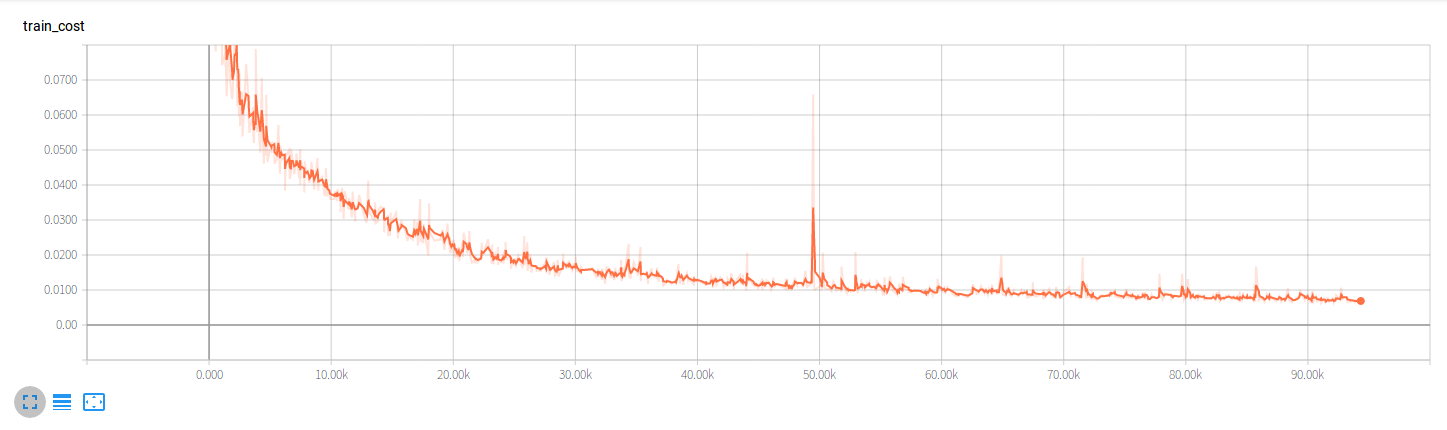
During my experiment the Total loss drops as follows:
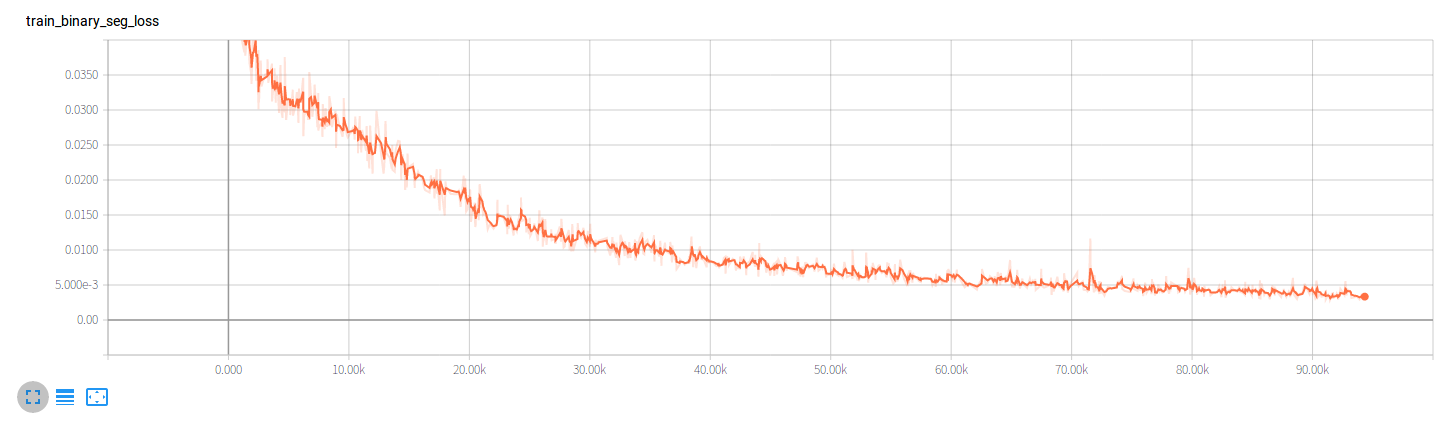
The Binary Segmentation loss drops as follows:
The Instance Segmentation loss drops as follows:

Experiment
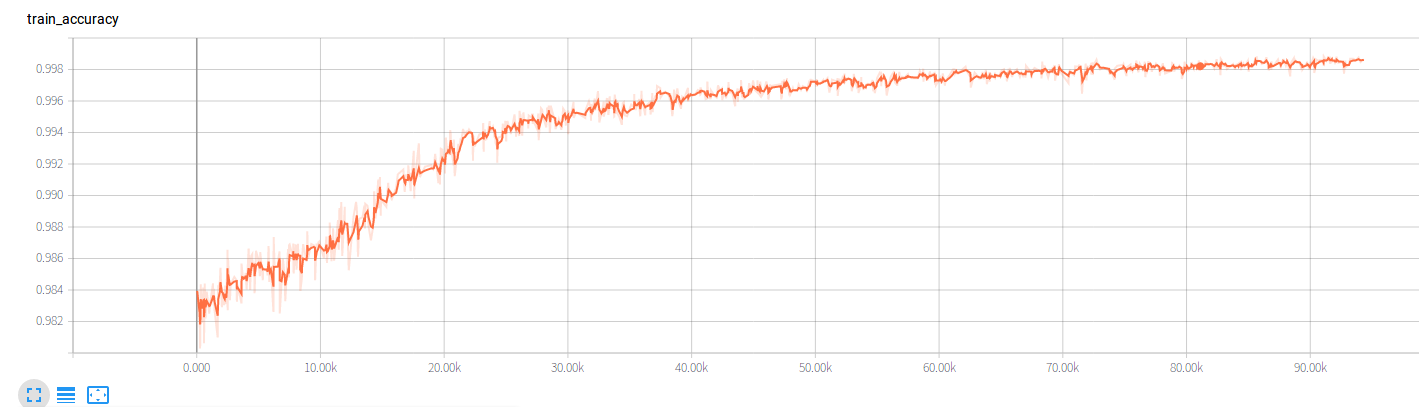
The accuracy during training process rises as follows:
Please cite my repo lanenet-lane-detection if you use it.
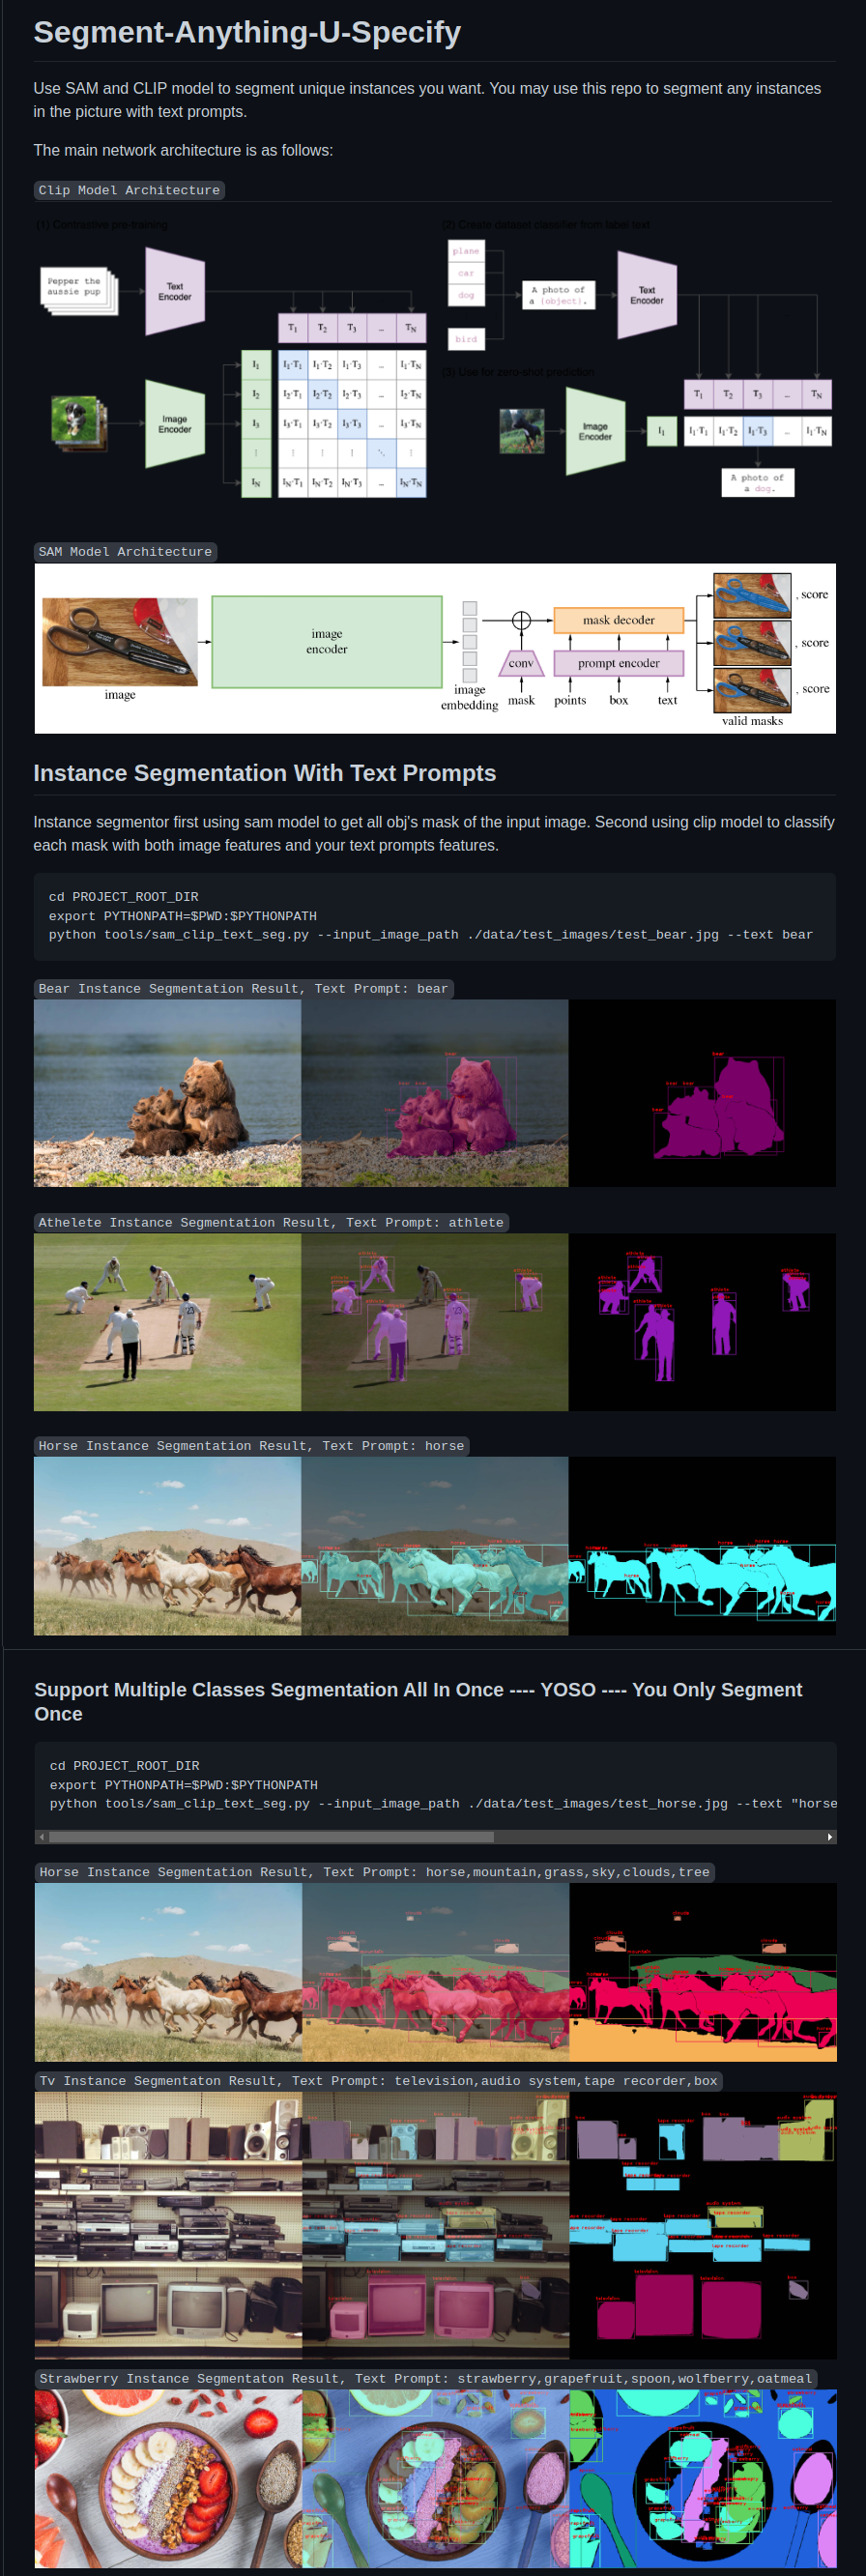
Segment-Anything-U-Specify
You must be interested in recently released SAM model. Here’s a repo using clip + sam to segment any instances you specify. segment-anything-u-specify.
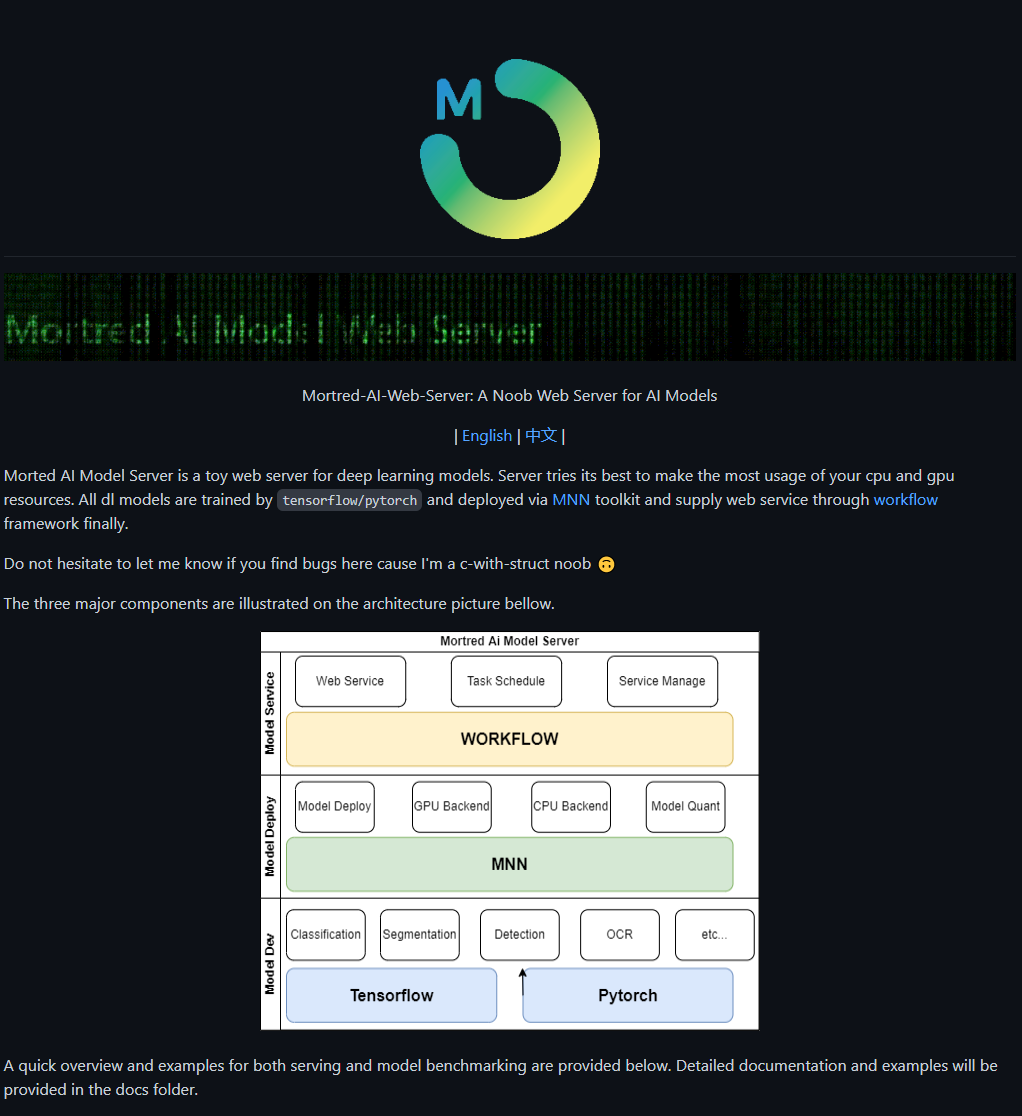
Serve Your Model
If you want to serve your model via a web server you may be interested in mortred_model_server which is a high performace web server for DNN vision models :fire::fire::fire:
Recently updates 2018.11.10
Adjust some basic cnn op according to the new tensorflow api. Use the traditional SGD optimizer to optimize the whole model instead of the origin Adam optimizer used in the origin paper. I have found that the SGD optimizer will lead to more stable training process and will not easily stuck into nan loss which may often happen when using the origin code.
Recently updates 2018.12.13
Since a lot of user want a automatic tools to generate the training samples from the Tusimple Dataset. I upload the tools I use to generate the training samples. You need to firstly download the Tusimple dataset and unzip the file to your local disk. Then run the following command to generate the training samples and the train.txt file.
python tools/generate_tusimple_dataset.py --src_dir path/to/your/unzipped/file
The script will make the train folder and the test folder. The training samples of origin rgb image, binary label image, instance label image will be automatically generated in the training/gt_image, training/gt_binary_image, training/gt_instance_image folder.You may check it yourself before start the training process.
Pay attention that the script only process the training samples and you need to select several lines from the train.txt to generate your own val.txt file. In order to obtain the test images you can modify the script on your own.
Recently updates 2020.06.12
Add real-time segmentation model BiseNetV2 as lanenet backbone. You may modify the config/tusimple_lanenet.yaml config file to choose the front-end of lanenet model.
New lanenet model trainned based on BiseNetV2 can be found here
BaiduNetDisk is available too.
You can download here https://pan.baidu.com/s/1sLLSE1CWksKNxmRIGaQn_A and extract code is 86sd
The new model can reach 78 fps in single image inference process.
Recently updates 2022.05.28
Since lots of user have encountered with a empty mask image problem when they do model inference using their own custom data. For example the user issue have encountered such a problem. I have openend a discussion here to give some advice to solve those problem.
That problem mainly caused by the dbscan cluster’s params was not properly adjusted for custom data. For example if I use the default dbscan param settled here
POSTPROCESS:
    MIN_AREA_THRESHOLD: 100
    DBSCAN_EPS: 0.35
    DBSCAN_MIN_SAMPLES: 1000
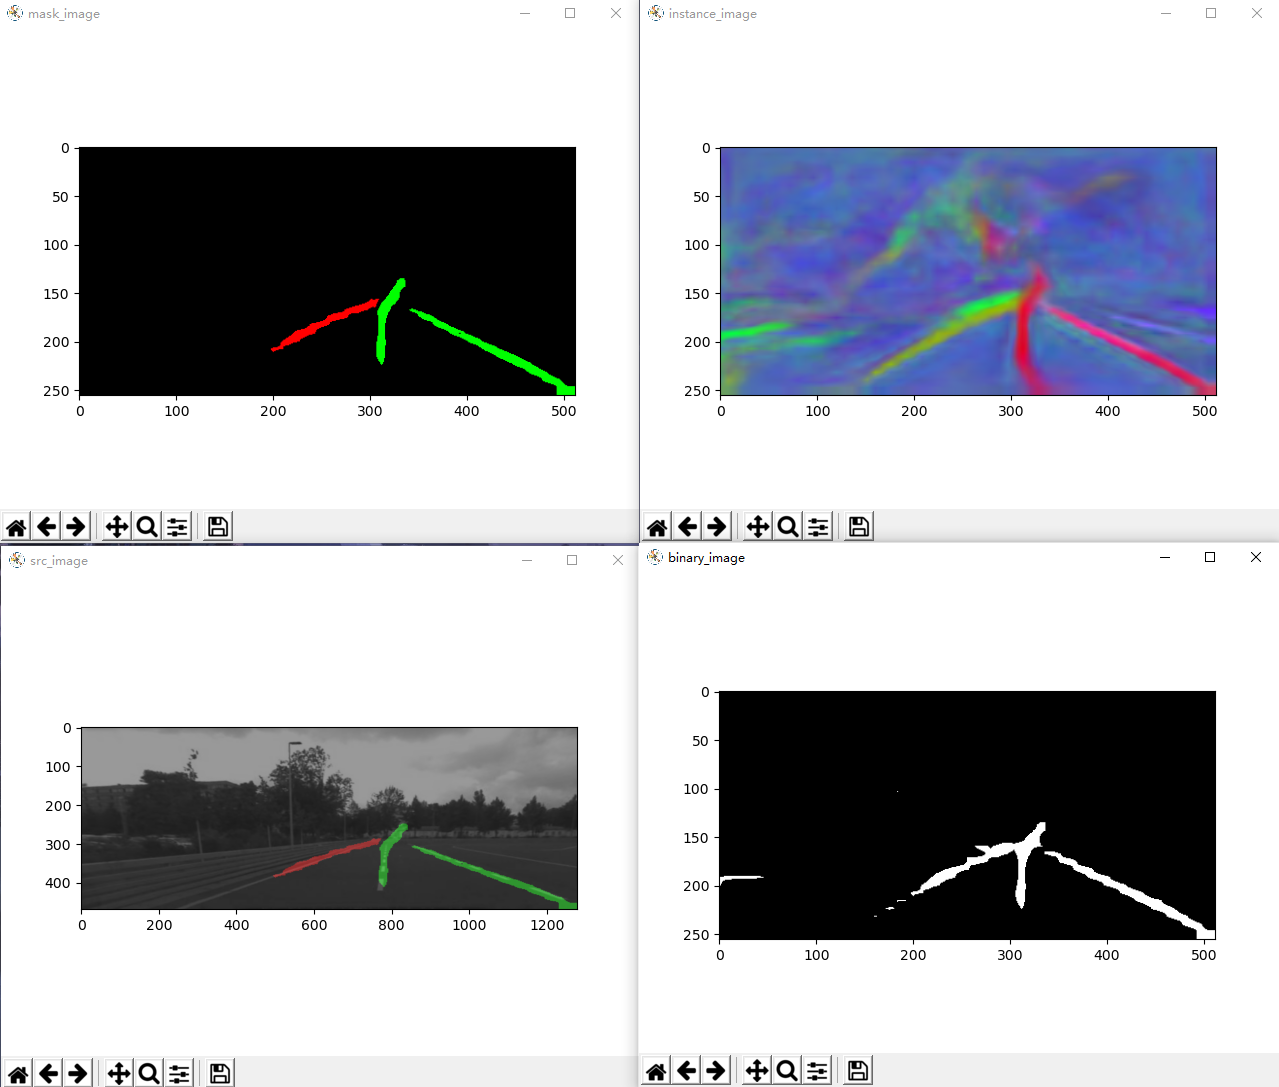
The inference result was
When I enlarge the dbscan DBSCAN_EPS param from 0.35 to 0.5 and reduce DBSCAN_MIN_SAMPLES from 1000 to 250. The infer
ence result was
Some more detailed discussion you may find in discussion module
The lane fit process in postprocess module was designed for tusimple dataset which means it can not work well on your custorm data. So I add an option in testing scripts to disable this feature when processing custom data. It will plot mask image directly upon source image
python tools/test_lanenet.py --weights_path /PATH/TO/YOUR/CKPT_FILE_PATH
--image_path ./data/custom_test_image/test.png --with_lane_fit 0
Before you test the example custom data remember to adjust dbscan cluster params following instruction above and the test
result should be like
To get better lane detection result on your own data you’d better train a new model on custom dataset rather than using the pretrained model directly.
Hope it helps:)
MNN Project
Add tools to convert lanenet tensorflow ckpt model into mnn model and deploy the model on mobile device
Freeze your tensorflow ckpt model weights file
cd LANENET_PROJECT_ROOT_DIR
python mnn_project/freeze_lanenet_model.py -w lanenet.ckpt -s lanenet.pb
Convert pb model into mnn model
cd MNN_PROJECT_ROOT_DIR/tools/converter/build
./MNNConver -f TF --modelFile lanenet.pb --MNNModel lanenet.mnn --bizCode MNN
Add lanenet source code into MNN project
Add lanenet source code into MNN project and modified CMakeList.txt to compile the executable binary file.
Status

Star History
TODO
- Add a embedding visualization tools to visualize the embedding feature map
- Add detailed explanation of training the components of lanenet separately.
- Training the model on different dataset
[ ] Adjust the lanenet hnet model and merge the hnet model to the main lanenet model[ ] Change the normalization function from BN to GN
Acknowledgement
The lanenet project refers to the following projects:
Visitor Count

Contact
Scan the following QR to disscuss :)